Sunday, November 1, 2009

Steak Bi-Bim Bahp

Happy Halloween or when this get posted, it will be belated Happy Halloween!!!... hehe~ :)
I love this picture it's so cute!!! :) I hope you had a great one and got a lot of candies... wheee~


When this drama (Brilliant Legacy) came out this year, the biggest thing was the steak bi-bim bahp.
They don't officially have a recipe unless I missed it... hehe~ This is my version of steak bi-bim bahp. I hope you like it as much as my dad... wheee~ :)

If you need some guidance with the ingredients, you can check my Korean Cooking 101. ;)

Ingredients:
lettuce
cucumber
2 eggs
salt
water
steak/beef
black pepper
garlic powder
1/2 onion
1-2 carrots
red pepper paste
sesame seed
vinegar
sugar

Step 1:
The first thing I do is cut my lettuce into small pieces. You can use any type of lettuce; romaine, salad, etc. I just use any lettuce I can find at home... lol~ Then I cut cucumber and mix it with the lettuce. The cucumber gives the crunchiness in the bi-bim bahp. ;)
In a small bowl, I crack two eggs. I add a pinch of salt and mix. I add a little bit of water to dilute the thickening of the eggs. You can skip the water if you like. ;) After I fry both sides, I let it sit. Then I cut it into julienne pieces.
Then I cut the beef/steak or any type of meat. I used steak in this case and seasoned it with black pepper and garlic powder. I cook the steak first! While I'm cooking the steak, I cut my onion and carrot. When the steak gets close to cooking, I add the onion and carrot. I cook it until the steak is done.
In a small bowl, I add red pepper paste; two spoonful for two people is fine. I add sesame seeds and mix the red pepper paste with vinegar. I keep adding vinegar until the thickening of the paste is soften. Once it's close to softening, I add a 1/2 to 1 spoonful of sugar and dilute with water. You don't need that much water maybe a spoonful is fine. Then I put it in the refrigerator. For some reason, the coolness of the refrigerator softens the paste.

Step 2:
Grab a big bowl and add rice on the bottom. Then I top it with lettuce with cucumber. On top of the lettuce, I put the steak with the onion and carrot. Then I finish it up with egg.
All you have to do is mix the rice dish with red pepper paste. Now you can eat... wheee~ ;)


Two months of No Buy has ended (click here to read the post). The reason why I didn't want to buy beauty related products is because I wanted to save money. For some odd reason instead of saving money, I think money went out more than usual *sigh*. Some of the things I had to spend money...
1. I had a flat tire and noticed all the other three were in bad shape. I had to change all 4 tires to new ones.
2. Tobey's vet bill. You guys know about Tobey's bite accident (click here to read the post). Thankfully the owner of the dog that attacked my dog paid her part, but I still had to pay for his shots and x-ray. X-ray cost more than $200!!!... eek~ :X
3. And other stuff... hehe~

I followed our deal, but having an exception actually made it easier to follow the No Buy deal. :X I had an exception of 1 or 2 visits to the CCO's. Well, I went twice... lol~ I posted one of the CCO visit (click here to read the post). Well, I went earlier in September during Labor Day with my dad. I only bought one thing.
I bought MAC What a Dame! highlighter powder. I needed a good highlighter powder since the one I have from Shiseido only worked on my tan skin. I needed one for the winter weather when I get lighter.
Here's how the powder looks when it's open. On the top, they added the shimmery stuff. Once you go below that, it's matte which is what I was looking for.


I'm going to end this post with swatches to the two lipglosses I got from the CCO's. Blovet Beauty requested swatches (click here to see the pictures of the lipglosses). I should have asked on my hand or on my lips... lol~ :X
I swatched it on my hand. The left one is MAC DazzleGlass in Sugarrimmed. For some reason, you can't really see the sparkle in this picture *sigh*. The one on the right is MAC CremeSheen in Melt In Your Mouth. By the way, I'm a big CremeSheen fan. I love them a lot!!! :)


Speaking of Blovet Beauty, she's having a 100th follower giveaway.
You should check her out. She's really adorable and sweet from what I can tell... hehe~ :)

credit: leemusic, soompi

Wednesday, October 28, 2009

Maybelline Stylish Smokes in Natural Smokes

Disclaimer: The product mentioned in this post is bought with my money. I am not affiliated with the company nor getting paid to advertise the product. This post is written with my honest opinion.

I bought this palette long time ago and I'm finally posting it. By looking at the pictures, the date was taken back in July. Wow!

Tuesday, October 20, 2009

Visee Blackish Forming Eyes in B-1 and B-3

Couple of weeks ago, October 10th to be exact, I visited my makeup buddy. I haven't seen her for a long time so it was nice seeing her, at the same time, to pick up my Japanese haul. Her brother went to Japan during the summer and I asked her if he can picked me up some. He was nice enough to do that. Thanks bro!!! :)

Thursday, October 15, 2009

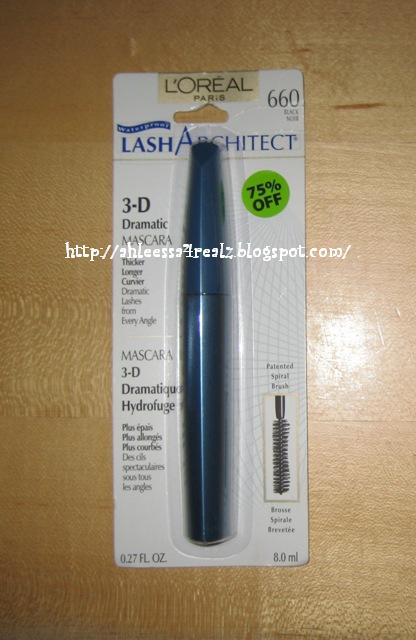
L'Oreal Lash Architect Waterproof in Black Noir

Disclaimer: The products mentioned in this post are bought with my money. I am not affiliated with the companies nor getting paid to advertise the products. This post is written with my honest opinion.

I believe I bought this end of last year but I could be wrong. Yup, I'm finally using it. I still have a gazillion more mascaras to go through.

Sunday, October 11, 2009

Dad's Birthday and Noodles with Vegetables and Beef (jap-chae)

Thank you for the ones who left me sweet comments about Tobey! I really appreciate it. :) He is doing much better. In one week, I have to take him back to get his stitches remove. We will finally move the cone on his head... lol~ I'm really looking forward to that, because that thing hurts when he runs towards you. :X

Thanks again y'all!!! :)


This week has been very busy for me with Tobey (wake up early, feed him medicine 2X a day, take him out many times a day for the bathroom, put warm compress 4X a day, etc...), as well as, my dad's birthday. My dad's birthday was on Thursday. I woke up early to cook for him. It took me 4 and a half hours of cooking!!!... eek~ :X
I made mi-yuk gook/seaweed soup (click here for the recipe), bu-chim gae or hea-mul jeon/seafood pancake (click here for the recipe), kim-chi jeon/kim-chi pancake (click here for the recipe), and jap chae. I know jap chae is a requested recipe and I apologize it took me this long to post it up!!! I just don't make this often because it takes a long time to make this dish. I tend to make it during special days like my dad's birthday. I hope you guys like it! :)

If you need some guidance with the ingredients, you can check my Korean Cooking 101. ;)

Ingredients:
water
5 shiitake mushroom
olive oil or any cooking oil
lots of chopped garlic
1/2 onion
3 carrots
2 eggs
salt
beef
spinach
sesame oil
noodle
sesame seeds
sugar
soy sauce

Step 1:
First thing you want to do it take out the dried shiitake mushroom and soak it in water for 2 hours. The mushroom will get bigger and softer.

Step 2:
Cut your onion in thin, long strips. You will be using the frying pan pretty often. In the frying pan, add oil and chopped garlic. Then cook the onion. Once the onion is done, toss it in a big bowl.
Cut your carrots into long, thin strips. Do the same thing as above cook it in the frying pan with oil, chopped garlic, and carrots. Then toss it in the same big bowl.

One of the things I do in between frying is clean the frying pan with a dry towel paper. It helps the next vegetable not to be discolored. ;)
In a small bowl, crack the eggs. I add a pinch of salt and a teaspoon of water. The water helps the eggs become more liquidity to fry. Fry the egg on both sides and cut them in long, thin strips. Toss it in the same big bowl.
In a small bowl, add these small mushrooms for 20 minutes in water. I have no clue what they're called... lol~ Then squeeze the small mushrooms to get the water out. I chop them up in small pieces, and fry them in oil and garlic. Then toss in the same big bowl. If you don't know what this is, you can skip this part. It isn't important to have them. ;)
After 2 hours of soaking the shiitake mushroom in water, squeeze the water out. Then chop them in thin, long strips. Fry them in oil and garlic. Then toss them in the same big bowl.
I soak my beef in hot water until the blood runs out. Once it stops bleeding, I cut them in small pieces. I fry them in garlic and black pepper. Then toss it in the big bowl.
In a pot, add water and wait until it boils. While you're waiting for the water to boil, cut the ends of the spinach and clean it. Once the water boils, add the clean spinach. You will leave the spinach in the hot water for 3 minutes.
Then drain the water and squeeze the spinach with your hands. I cut them into small pieces which makes eating them easier. Then in a small bowl, I add the ingredients pinch of salt, chopped garlic, and sesame oil. I mix them and throw it in the big bowl.
This is how the big bowl will look like.

Step 3:
I don't know which noodles are good, but I used this one. It came out great to me... hehe~ ;)
In a pot, add water and wait until it boils. Once it boils, add the noodle. You cook it until it becomes soft. It takes about 5-10 minutes depending on the noodle. Then drain the water like you do spaghetti.
Then I fry it in oil and garlic. It makes the noodles more transparent, as well as, makes it easier to mix with the vegetables. Then throw it in the big bowl.

I forgot to take a picture of all of them in the big bowl *sigh*. Sorry!!! :X Basically, you mix the noodle with the vegetables and beef. You add soy sauce, sesame oil, sesame seeds, and sugar. The most crucial ingredients is sugar and soy sauce.
It should look like this at the end... yummy!~!~ :)

This is the traditional way of making this dish. It takes longer to make this than the modern way. The modern way is to cut all the vegetables and fry them together. It takes less time, but I think the traditional way taste better! ;) It is up to you which one you want to do... hehe~


I'm going to end this post with a freebie... wheee~ ;)
Here's another coupon that is still usable (click here for the coupon). It expires in December of this year. I hope you like it!!! :)

Tuesday, October 6, 2009

Happy Belated Chuseok (Thanksgiving) and Tobey's Update

Happy belated Chuseok everyone!

I hope everyone had a good Chuseok and you guys ate dduk (rice cake). :) It's Korean tradition to eat dduk on this day, as well as, New Years. I hope people are thankful for the things you have... hehe~ I know I am on this day! :)

The reason why I am thankful is because Tobey is okay!!! :) My day I spent it in the emergency room, as well as, taking care of Tobey. So for the people who don't know what happened I took Tobey to the dog park. I do this every morning or almost every morning since I started in March of this year. I walk him around the dog park so he, as well as, I will get some exercise. Typical Saturday I woke up early in the morning to take him to the dog park. We walked around until I got tired than I sat down at a bench. Some dog I have never seen sneaked from the back and took a big bite out of Tobey. All I saw was a chunk of hair gone and his skin. A minute later it started bleeding like crazy. I took him to the emergency room. They told me the bite was pretty deep so they had to sedate him, shave around the area, clean the wound, and stitch him up. Poor baby!!! :'(

I took pictures of Tobey and his stitch that night. Since he's able to lick/take out the stitches, they have him wearing a cone around his head.
It's gigantic!... lol~ He's not able to walk through the door, jump on the bed, and so on. Doesn't he look cute though!?!?


WARNING: The Next Picture Is Graphic!!!


That's how the stitch looks like. There's one staple I noticed and everything else was stitched up with a thread; I would say about 10 stitches.

I just have to put this picture up, because he just looks so cute!!! :)

This past weekend was really stressful for me. Tobey was the strong one... lol~ I was the emotional wreck. :X I couldn't stop crying because I felt guilty. I blamed myself what if I did this or that. If only, then he wouldn't have been bitten. I know it's no one's fault but that dog, but it really broke my heart seeing Tobey hurt!!! :'(

I just want to thank the people who listened and comforted me during this hard time. Thank you for the people in Twitter (vansmakeupride, MrsZeus, & miraclekoh) and especially two people who really comforted me through direct messages (rasilla and spankedelic). My real life friend through Facebook (Kathryn) and MSN last night (you know who you are... hehe~). I really appreciate it!

Thank you!!! :)

Sunday, September 27, 2009

Olive and Brown Look Tutorial

Howdy!!! :) All I can say is it feels weird to post after several weeks away from the blogging world... hehe~ :X Anyways, Blair requested a tutorial of a look I showed her. I usually don't post tutorials, because it seems like people are not interested in my eye makeup look *sigh*. I know I'm not a makeup guru, but this is how I do my eye look. I hope you guys like it... wheee~ :)

What I used:
[T-B, L-R: MAC Paint Pot in Moss Scape, MAC in Sumptuous Olive, MAC in Mulch, CG in Sugar Rush (farthest right the cream color), Smashbox in Smashing Beacon (farthest right the white color), UDPP, L'oreal Lash Architect in Black Noir, MF Pensilks in Black Velvet]

What tools I used:
(T-B: CS eyeshadow brush, Laneigh eyeshadow brush, Sonia Kashuk large crease brush, Sonia Kashuk eyeliner brush, Essence of Beauty eyeliner brush)

My look:
I prep my eyes with UDPP or else my makeup with crease. I recommend this if your eyelid is oily. If it's not, I don't think you need to do it. You get a small amount on each eye and blend with your finger. DON'T forget to put some on the bottom of your eyes and the inner corner.
With my finger, I apply MAC Paint Pot in Moss Scape to my lids. I make sure it's the brightest towards the lashes and the lightest on the crease. You don't need to color your crease but I noticed when I apply UDPP, it's harder to blend or maybe it's just my lack of experience... lol~ :P For that reason I have some base on my crease making it easier to blend. :)
Using an eyeshadow brush (I used Laneigh), I pat on MAC eyeshadow in Sumptuous Olive on my lid. You don't have to use a brush you can still use a sponge applicator. Just make sure you pat it instead of brushing it side to side. The reason why you pat the eyeshadow is to make the color bolder.
With your crease brush, dip it into MAC eyeshadow in Mulch.
I always start from the outer corner in. I find the eye socket on my outer "V" area.
It should look like that on the outer corner. ;)
Then I blend from the outer corner to inner crease. I usually stop 2/3rds in. If you need to grab more Mulch and blend more color, feel free to do so. ;)
Then I grab more Mulch and color from the outer corner to 1/3rd in the lid. I like the look of transition from olive color to brown. I'm not too keen about having green lid and brown crease. Coloring the brown over the green gives you a transition color or maybe it's just me... hehe~ ;)
It'll look like this. :)
Then I color my eyebrow which isn't shown and with a thicker eyeshadow brush (Coastal Scents), I highlight using CG Sugar Rush. I make sure it's the brightest right underneat the eyebrows. ;)
With the Max Factor eyeliner pencil, I line the top lid. By the way, I'm not too keen on the Max Factor eyeliner pencil but it got a good rating on Makeup Alley (85%)... lol~ :X I used to use the L'oreal HIP cream eyeliner in Black, but it dried out. It got to the point where weting my brush didn't work anymore *sigh*. I wouldn't buy that again... lol~ :X
Then I line the bottom with MAC eyeshadow in Mulch and Smashbox cream eyeliner in Smashing Beacon (the white side). I also use the Smashbox cream eyeliner in the inner corner of my eyes. I usually don't line my waterline since nothing seems to work on me. :/
Then I curl my eyelashes and put mascara on. Here's my final look *wipe sweat*... wheee~ :)

What do you think?


I'm going to end this post with an apple I made. I made this for a lady I know.
You can get the pattern at Lion Brand Yarn (click here).

Tuesday, September 1, 2009

No Buy Deal

Sorry I haven't updated in a while! You will see why at the end of this post... hehe~ ;)

Anyways, Blair and I have been in talks for several weeks about being on a No Buy for several months. At first, I thought it was just a fun chat and then as time went on we actually agree to have a No Buy for 2 months. I think it will definitely help me from not buying cosmetics. For someone who isn't a makeup artist, I sure have a lot *sigh*!!!... hehe~ :X It'll also help me money-wise since I'm not a full-time worker. I need all the money saved to pay off other things. :X Here's what is in our deal...


RULES:
1. NO buying any beauty related products (skincare, cosmetics, hair products, and body-related products) from September 1st to November 1st.
2. The only time you can buy beauty related products is when you’re out of the product and don’t have a spare, and to buy for others as a gift.
3. If you fail, you have to use the beauty products you have and do a makeover. You have to make yourself look like a clown, not a pretty one but an embarrassing one, and post a picture of your face on your blog.

EXCEPTIONS:
Ahleessa: One or two time visit at a CCO.
Blair: One time order from Gmarket.

The credit goes to Blair for making the logo, and Ahleessa (I) for typing up the rules. :)

We thought it'll be fun to have a tag-type of deal and hopefully, people who want to join in can. It can be a new trend in the blogging world to save money... hehe~ ;) If anyone wants to join in during these two months, please feel free too. Post the logo and the rules. If you want, you can tell me your one exception and I'll add you onto my list. I will try my best to check up on you in a weekly basis... hehe~ ;)

Another thing I might do that we didn't talk about is write my weekly buys on my blog so I can have an idea how much money I spend in a week. The key word here is I will TRY... lol~ :X It's not a guaranteed!


I actually started my No Buy early... hehe~ I have been pretty good! It has motivated me to find other ways to get cosmetics. One way has been looking for freebies online... hehe~ ;) I will tell you two from Aveda. ;) I give credit to Soompi, as well as, my makeup buddy for these coupons... hehe~
I got a free Hand Relief lotion worth $7.99. Here's the coupon you can print out and take it to the closest Aveda (click here for the coupon). It expires September 30th.
I also got a free Foot Relief lotion worth $7.99. Here's the coupon for this as well (click here for the coupon). ;) I don't know when this expires.

I have several more but you will have to wait to see if I can get them. I don't want to post it without a guaranteed. Stay tune to my blog... lol~ :P


Now going back to the beginning of this post, I have been pretty busy crocheting dolls for my niece's 3rd birthday and my nephew's 100th days party.
I made a Hello Kitty doll and a giraffe.
For my niece, I made her a Hello Kitty doll. Yes, I had another niece who didn't get one yet (last one by the way)... lol~ :X Check out my other Hello Kitty dolls I made for my other three munchkins (click here for the other three).
For my nephew, I made him a giraffe. I found the pattern on Lion Brand Yarn. I think the picture of the amigurumi doll on there looks cuter than the one I made... lol~ :X


For the people who live close to me, I hope you guys are okay with the fire!!! Make sure to stay indoors with the windows close, drink lots of water, and stay away from the outside as much as possible. For the people who don't live close to me, there's a huge fire that has been increasing in daily basis since the fire started Wednesday (I heard it increased twice the size this morning compared to last night *sigh*) last week. It's so bad I smell smoke all the time and wake up with debris on my car!!! :(


PLEASE check out my blog sale (click here for the post)!!! :)
Related Posts Plugin for WordPress, Blogger...